How to Install the PHP mcrypt Extension

In the examples shown, replace “X.Y” with your app’s PHP version (for example, “7.2”).
The mcrypt extension is an interface to the mcrypt cryptography library. This extension is useful for allowing PHP code using mcrypt to run on PHP 7.2+.

The mcrypt extension is included in PHP 5.4 through PHP 7.1. It was removed from PHP 7.2 and moved to an unofficial PECL extension because the mcrypt library is no longer maintained.

For PHP 7.2+, PHP instead uses libsodium as a cryptography library. ServerPilot builds PHP 7.2+ with the official libsodium extension. New PHP code should be written to use libsodium rather than mcrypt.

Installing mcrypt on PHP 5, PHP 7.0, and PHP 7.1
You do not need to install the mcrypt extension on PHP 5, 7.0, or 7.1. ServerPilot builds these PHP versions with the mcrypt extension so it is always available.

Installing mcrypt on PHP 7.2, 7.3, or 7.4
To install this extension on PHP 7.2 through 7.4, run the following commands as your server’s root user:

sudo apt-get -y install gcc make autoconf libc-dev pkg-config
sudo apt-get -y install libmcrypt-dev
sudo pecl7.2-sp install --nodeps mcrypt-snapshot

When you are shown the prompt

libmcrypt prefix? [autodetect] :

Press Enter to autodetect.

Once installed, create a configuration file for the extension and restart PHP by running the following commands as root:

sudo bash -c "echo extension=mcrypt.so > /etc/php7.2-sp/conf.d/mcrypt.ini"
sudo service php7.2-fpm-sp restart

Verifying mcrypt Is Installed
You can check that the extension was installed with this command:

php7.2-sp -i | grep mcrypt

The output will look like this:

$ php7.2-sp -i | grep mcrypt
/etc/php7.2-sp/conf.d/mcrypt.ini,
Registered Stream Filters => zlib.*, convert.iconv.*, bzip2.*, string.rot13, string.toupper, string.tolower, string.strip_tags, convert.*, consumed, dechunk, mcrypt.*, mdecrypt.*
mcrypt
mcrypt support => enabled
mcrypt_filter support => enabled
mcrypt.algorithms_dir => no value => no value
mcrypt.modes_dir => no value => no value

Uninstalling the Mcrypt Extension
To uninstall this extension, as root run the commands:

sudo rm /etc/phpX.Y-sp/conf.d/mcrypt.ini
sudo peclX.Y-sp uninstall mcrypt

Next, restart PHP-FPM with the command:

sudo service phpX.Y-fpm-sp restart

How to Manually Upgrade phpMyAdmin on Ubuntu

I have running Ubuntu 18.04 on my workstation. I have the phpMyAdmin older version installed on it. Initially, the phpMyAdmin was installed through the Apt package manager.

phpMyAdmin installation via Apt package manager create multiple directories:

/etc/phpmyadmin – Configuration files
/var/lib/phpmyadmin – Library and tmp directries
/usr/share/phpmyadmin – Main phpMyAdmin installation
Step 1 – Backup phpMyAdmin
You should take a back up of your current phpMyAdmin directory. However, I have just renamed it to phpmyadmin.bak at the same location.

sudo mv /usr/share/phpmyadmin/ /usr/share/phpmyadmin.bak
Step 2 – Download Latest phpMyAdmin
Now, download the latest phpMyAdmin archive file from its official download page. During last update of this article phpMyAdmin 4.8.5 is latest version available for download.

wget https://files.phpmyadmin.net/phpMyAdmin/4.8.5/phpMyAdmin-4.8.5-all-languages.zip
unzip phpMyAdmin-4.8.5-all-languages.zip
You will see a directory phpMyAdmin-4.8.5-all-languages in the current location. Move this latest directory to the appropriate location.

sudo mv phpMyAdmin-4.8.5-all-languages /usr/share/phpmyadmin
Step 3 – Update Configuration
As I told the existing phpMyAdmin was installed with Apt package manager. Therefore you need to specify the TEMP_DIR and CONFIG_DIR location under the vendor_config.php file.

Edit vendor_config.php file in your favorite text editor

sudo vim /usr/share/phpmyadmin/libraries/vendor_config.php
and update the following values.

define(‘TEMP_DIR’, ‘/var/lib/phpmyadmin/tmp/’);
define(‘CONFIG_DIR’, ‘/etc/phpmyadmin/’);
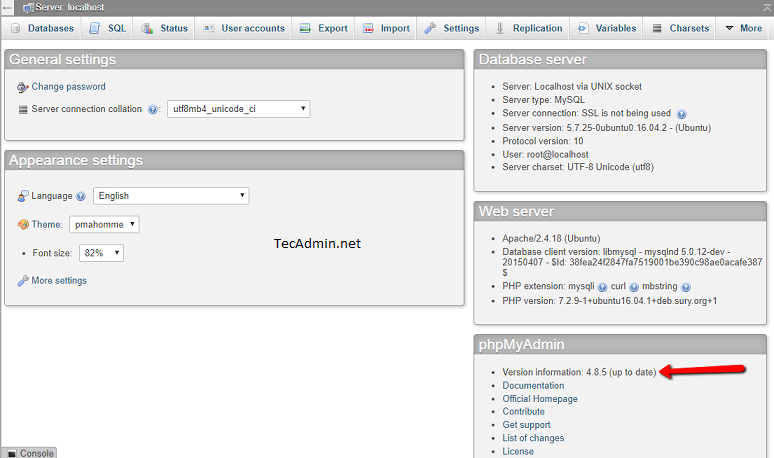
Save the file and access the phpMyAdmin in a web browser.


All done. In conclusion, You have the latest phpMyAdmin running on your Ubuntu system.

各种开发语言示例调用WebService接口

ASP示例:

<%
uid=”账号”
pwd=”密码”
tos=”13900041123″
msg=”你们好”
url = “http://URL/Service.asmx/SendMessages
SoapRequest=”uid=”&uid&”&pwd=”&pwd&”&tos=”&tos&”&msg=”&msg&”&otime=”
”””””””””””””以下代码不变””””””””””””””””””””””””””””””””””””””””
Set xmlhttp = server.CreateObject(“Msxml2.XMLHTTP”)
xmlhttp.Open “POST”,url,false
xmlhttp.setRequestHeader “Content-Type”, “application/x-www-form-urlencoded”‘注意
xmlhttp.setRequestHeader “HOST”,”URL”
xmlhttp.setRequestHeader “Content-Length”,LEN(SoapRequest)
xmlhttp.Send(SoapRequest)
If xmlhttp.Status = 200 Then
Set xmlDOC = server.CreateObject(“MSXML.DOMDocument”)
xmlDOC.load(xmlhttp.responseXML)
showallnode “string”,xmlDOC’调用SHOWALLNODE
Set xmlDOC = nothing
Else
Response.Write xmlhttp.Status&”&nbsp;”
Response.Write xmlhttp.StatusText
End if
Set xmlhttp = Nothing

Function showallnode(rootname,myxmlDOC)
set nodeobj=myxmlDOC.documentElement.selectSingleNode(“//”&rootname&””)’当前结点对像
if nodeobj.text<>”” then
returnstring=returnstring&”返回值:”&nodeobj.text
end if
response.write returnstring
set nodeobj=nothing
End Function
%>

或者

function SendMessages(uid,pwd,tos,msg,otime)
SoapRequest=”<?xml version=”&CHR(34)&”1.0″&CHR(34)&” encoding=”&CHR(34)&”utf-8″&CHR(34)&”?>”& _
“<soap:Envelope xmlns:xsi=”&CHR(34)&”http://www.w3.org/2001/XMLSchema-instance”&CHR(34)&” “& _
“xmlns:xsd=”&CHR(34)&”http://www.w3.org/2001/XMLSchema”&CHR(34)&” “& _
“xmlns:soap=”&CHR(34)&”http://schemas.xmlsoap.org/soap/envelope/”&CHR(34)&”>”& _
“<soap:Body>”& _
“<SendMessages xmlns=”&CHR(34)&”http://tempuri.org/”&CHR(34)&”>”& _
“<uid>”&uid&”</uid>”& _
“<pwd>”&pwd&”</pwd>”& _
“<tos>”&tos&”</tos>”& _
“<msg>”&msg&”</msg>”& _
“<otime>”&otime&”</otime>”& _
“</SendMessages>”& _
“</soap:Body>”& _
“</soap:Envelope>”

Set xmlhttp = server.CreateObject(“Msxml2.XMLHTTP”)
xmlhttp.Open “POST”,url,false
xmlhttp.setRequestHeader “Content-Type”, “text/xml;charset=utf-8”
xmlhttp.setRequestHeader “HOST”,”URL”
xmlhttp.setRequestHeader “Content-Length”,LEN(SoapRequest)
xmlhttp.setRequestHeader “SOAPAction”, “http://tempuri.org/SendMessages” ‘一定要与WEBSERVICE的命名空间相同,否则服务会拒绝
xmlhttp.Send(SoapRequest)
”样就利用XMLHTTP成功发送了与SOAP示例所符的SOAP请求.’检测一下是否返回200=成功:

If xmlhttp.Status = 200 Then
Set xmlDOC = server.CreateObject(“MSXML.DOMDocument”)
xmlDOC.load(xmlhttp.responseXML)
SendMessages=xmlDOC.documentElement.selectNodes(“//SendMessagesResult”)(0).text ‘显示节点为GetUserInfoResult的数据(返回字符串)
Set xmlDOC = nothing
Else
SendMessages=xmlhttp.Status&”&nbsp;”
SendMessages=xmlhttp.StatusText
End if
Set xmlhttp = Nothing
end function

Delphi示例:

procedure TForm1.Button2Click(Sender: TObject);
var
uid,pwd,mob,txt:WideString;
Iservice:   Service1Soap;
back_info:string;
begin
HTTPRIO1.URL:=service_url.Text;
HTTPRIO1.HTTPWebNode.Agent := ‘Borland SOAP 1.2’;
HTTPRIO1.HTTPWebNode.UseUTF8InHeader := true;
Iservice:= HTTPRIO1 as Service1Soap;
//______________

uid:=euid.Text;
pwd:=epwd.Text;
mob:=emobno.Text;
txt:=econtent.Text;

back_info:=Iservice.SendMessages(uid,pwd,mob,txt,”);
memo2.Text:=back_info;
if length(trim(back_info))>3 then begin
showmessage(‘短信发送成功’+back_info);
end else begin
showmessage(‘短信发送失败’+back_info);
end;
end;

注:

initialization
InvRegistry.RegisterInterface(TypeInfo(Service1Soap), ‘http://tempuri.org/’, ‘utf-8’);
InvRegistry.RegisterDefaultSOAPAction(TypeInfo(Service1Soap), ‘http://tempuri.org/%operationName%’);
//delphi调用net2.0需要加这一行。否则会出错。
InvRegistry.RegisterInvokeOptions(TypeInfo(Service1Soap), ioDocument);

end.

JAVA示例:

需要导入axis.jar

package server;
import java.io.InputStream;
import java.io.OutputStream;
import java.io.OutputStreamWriter;
import java.net.URLConnection;
import java.net.*;
import javax.xml.parsers.DocumentBuilder;
import javax.xml.parsers.DocumentBuilderFactory;
import org.w3c.dom.Document;
import org.w3c.dom.Node;
import org.w3c.dom.NodeList;

public class smsService {

private String getSoapSmssend(String userid,String pass,String mobiles,String msg,String time)
{
try
{
String soap = “”;
soap = “<?xml version=\”1.0\” encoding=\”utf-8\”?>”
+”<soap:Envelope xmlns:xsi=\”http://www.w3.org/2001/XMLSchema-instance\” xmlns:xsd=\”http://www.w3.org/2001/XMLSchema\” xmlns:soap=\”http://schemas.xmlsoap.org/soap/envelope/\“>”
+”<soap:Body>”
+”<SendMessages xmlns=\”http://tempuri.org/\“>”
+”<uid>”+userid+”</uid>”
+”<pwd>”+pass+”</pwd>”
+”<tos>”+mobiles+”</tos>”
+”<msg>”+msg+”</msg>”
+”<otime>”+time+”</otime>”
+”</SendMessages>”
+”</soap:Body>”
+”</soap:Envelope>”;
return soap;
}
catch (Exception ex)
{
ex.printStackTrace();
return null;
}
}

private InputStream getSoapInputStream(String userid,String pass,String mobiles,String msg,String time)throws Exception
{
URLConnection conn = null;
InputStream is = null;
try
{
String soap=getSoapSmssend(userid,pass,mobiles,msg,time);
if(soap==null)
{
return null;
}
try{

URL url=new URL(“http://URL/Service.asmx“);

conn=url.openConnection();
conn.setUseCaches(false);
conn.setDoInput(true);
conn.setDoOutput(true);
conn.setRequestProperty(“Content-Length”, Integer.toString(soap.length()));
conn.setRequestProperty(“Content-Type”, “text/xml; charset=utf-8”);
conn.setRequestProperty(“HOST”,”URL”);
conn.setRequestProperty(“SOAPAction”,”\”http://tempuri.org/SendMessages\“”);

OutputStream os=conn.getOutputStream();
OutputStreamWriter osw=new OutputStreamWriter(os,”utf-8″);
osw.write(soap);
osw.flush();
}catch(Exception ex){
System.out.print(“SmsSoap.openUrl error:”+ex.getMessage());
}
try{
is=conn.getInputStream();
}catch(Exception ex1){
System.out.print(“SmsSoap.getUrl error:”+ex1.getMessage());
}

return is;
}
catch(Exception e)
{
System.out.print(“SmsSoap.InputStream error:”+e.getMessage());
return null;
}
}

//发送短信
public String sendSms(String userid,String pass,String mobiles,String msg,String time)
{
String result = “-12”;
try
{
Document doc;
DocumentBuilderFactory dbf=DocumentBuilderFactory.newInstance();
dbf.setNamespaceAware(true);
DocumentBuilder db=dbf.newDocumentBuilder();
InputStream is=getSoapInputStream(userid,pass,mobiles,msg,time);
if(is!=null){
doc=db.parse(is);
NodeList nl=doc.getElementsByTagName(“SendMessagesResult”);
Node n=nl.item(0);
result=n.getFirstChild().getNodeValue();
is.close();
}
return result;
}
catch(Exception e)
{
System.out.print(“SmsSoap.sendSms error:”+e.getMessage());
return “-12”;
}
}

}

PHP示例:

<?php
$uid = “账号”;//用户账户
$pwd = “密码”;//用户密码
$mobno = “手机号码”;//发送的手机号码,多个请以英文逗号隔开如”138000138000,138111139111″
$content = “发送内容”;//发送内容
$otime = ”;//定时发送,暂不开通,为空
$client = new SoapClient(“URL/Service.asmx?WSDL“);
$param = array(‘uid’ => $uid,’pwd’ => $pwd,’tos’ => $mobno,’msg’ => $content,’otime’=>$otime);
$result = $client->__soapCall(‘SendMessages’,array(‘parameters’ => $param));
var_dump($result);
die();
?>

VB.NET示例:

Protected Sub Button1_Click(ByVal sender As Object, ByVal e As EventArgs) Handles Button1.Click
Dim objSoap As Object, url As String
url = “URL/Service.asmx?wsdl
objSoap = CreateObject(“MSSOAP.SOAPClient30”)
objSoap.ClientProperty(“ServerHTTPRequest”) = True
objSoap.MSSoapInit(url)

txtReturn.Text = objSoap.SendMessages(txtName.Text, txtPwd.Text, txtPhone.Text, txtContent.Text, “”)

End Sub

VB示例:

Private Sub Command1_Click()

Dim mySoap As New MSSOAPLib30.SoapClient30
mySoap.ClientProperty(“ServerHTTPRequest”) = True
mySoap.MSSoapInit “URL/Service.asmx?WSDL
txtReturn.Text = mySoap.SendMessages(txtName.Text, txtPwd.Text, txtPhone.Text, txtContent.Text, “”)
Set mySoap = Nothing

End Sub

VC示例:

private: System::Void button1_Click(System::Object^  sender, System::EventArgs^  e) {

TService:: Service1 ^v = gcnew TService:: Service1;//添加Web引用

txtReturn ->Text = v -> SendMessages(txtName ->Text,txtPwd->Text,txtPhone->Text,txtContent->Text,””);
}
};
php curl 分离header和body信息

php中可以通过curl来模拟http请求,同时可以获取http response header和body,当然也设置参数可以只获取其中的某一个。当设置同时获取response header和body时候,它们会一同作为结果返回。这时需要我们自己来分离它们。

下面代码是模拟向google一个http GET请求

function httpGet() {
$url = ‘http://www.google.com.hk’;
$ch = curl_init();
curl_setopt($ch, CURLOPT_URL, $url);
curl_setopt($ch, CURLOPT_HEADER, TRUE); //表示需要response header
curl_setopt($ch, CURLOPT_NOBODY, FALSE); //表示需要response body
curl_setopt($ch, CURLOPT_RETURNTRANSFER, TRUE);
curl_setopt($ch, CURLOPT_FOLLOWLOCATION, FALSE);
curl_setopt($ch, CURLOPT_AUTOREFERER, TRUE);
curl_setopt($ch, CURLOPT_TIMEOUT, 120);
$result = curl_exec($ch);
if (curl_getinfo($ch, CURLINFO_HTTP_CODE) == ‘200’) {
return $result;
}
return NULL;
}

调用上述方法后看到如下类似输出:

HTTP/1.1 200 OK
Date: Tue, 09 Jul 2013 14:21:08 GMT
Expires: -1
Cache-Control: private, max-age=0
Content-Type: text/html; charset=UTF-8
Set-Cookie: PREF=ID=75e996a7ad21f47b:FF=0:NW=1:TM=1373379668:LM=1373379668:S=TTLQQN-jwGDYnkkY; expires=Thu, 09-Jul-2015 14:21:08 GMT; path=/; domain=.google.com.hk
Set-Cookie: NID=67=PPu7FfFeuZqwfsrUifgzjidX4JZxxCPLe9xFHjdXhfHpzs3gaykFSH5uGXy2esWTlp_rdqIYkjFDMollzI_sA-8owxD3mDh6KCRwdMa9-g5VChj0E5XAGNjo9d-sZfLN; expires=Wed, 08-Jan-2014 14:21:08 GMT; path=/; domain=.google.com.hk; HttpOnly
P3P: CP=”This is not a P3P policy! See http://www.google.com/support/accounts/bin/answer.py?hl=en&answer=151657 for more info.”
Server: gws
X-XSS-Protection: 1; mode=block
X-Frame-Options: SAMEORIGIN
Transfer-Encoding: chunked
Google(function(){
window.google={kEI:”VBzcUdWuHOmtiQf64IHoCw”,getEI:function(a){for(var b;a&&(!a.getAttribute||!(b=a.getAttribute(“eid”)));
……
这里可以看到结果中header和body信息是在一起的,那么如何分离它们呢。方法有二种,一是通过curl自带的curl_getinfo()方法获取头的长度,然后使用substr来分割字符串。示例代码如下:

$response = curl_exec($ch);
if (curl_getinfo($ch, CURLINFO_HTTP_CODE) == ‘200’) {
$headerSize = curl_getinfo($ch, CURLINFO_HEADER_SIZE);
$header = substr($response, 0, $headerSize);
$body = substr($response, $headerSize);
}
第二种方法基于header和body是通过两个回车换行来分割的,所以可以通过如下代码实现:

$response = curl_exec($ch);
if (curl_getinfo($ch, CURLINFO_HTTP_CODE) == ‘200’) {
list($header, $body) = explode(“\r\n\r\n”, response, 2);
}

PHP中使用CURL实现GET和POST请求

CURL 是一个利用URL语法规定来传输文件和数据的工具,支持很多协议,如HTTP、FTP、TELNET等。最爽的是,PHP也支持 CURL 库。使用PHP的CURL 库可以简单和有效地去抓网页。你只需要运行一个脚本,然后分析一下你所抓取的网页,然后就可以以程序的方式得到你想要的数据了。无论是你想从从一个链接上取部分数据,或是取一个XML文件并把其导入数据库,那怕就是简单的获取网页内容,CURL 是一个功能强大的PHP库。

PHP建立CURL请求的基本步骤

①:初始化

curl_init()

②:设置属性

curl_setopt().有一长串CURL 参数可供设置,它们能指定URL请求的各个细节。

③:执行并获取结果

curl_exec()

④:释放句柄

curl_close()

CURL实现GET和POST

①:GET方式实现

 1  //初始化
 2     $curl = curl_init();
 3     //设置抓取的url
 4     curl_setopt($curl, CURLOPT_URL, 'http://www.baidu.com');
 5     //设置头文件的信息作为数据流输出
 6     curl_setopt($curl, CURLOPT_HEADER, 1);
 7     //设置获取的信息以文件流的形式返回,而不是直接输出。
 8     curl_setopt($curl, CURLOPT_RETURNTRANSFER, 1);
 9     //执行命令
10     $data = curl_exec($curl);
11     //关闭URL请求
12     curl_close($curl);
13     //显示获得的数据
14     print_r($data);
复制代码

②:POST方式实现

复制代码
 1 //初始化
 2     $curl = curl_init();
 3     //设置抓取的url
 4     curl_setopt($curl, CURLOPT_URL, 'http://www.baidu.com');
 5     //设置头文件的信息作为数据流输出
 6     curl_setopt($curl, CURLOPT_HEADER, 1);
 7     //设置获取的信息以文件流的形式返回,而不是直接输出。
 8     curl_setopt($curl, CURLOPT_RETURNTRANSFER, 1);
 9     //设置post方式提交
10     curl_setopt($curl, CURLOPT_POST, 1);
11     //设置post数据
12     $post_data = array(
13         "username" => "coder",
14         "password" => "12345"
15         );
16     curl_setopt($curl, CURLOPT_POSTFIELDS, $post_data);
17     //执行命令
18     $data = curl_exec($curl);
19     //关闭URL请求
20     curl_close($curl);
21     //显示获得的数据
22     print_r($data);

③:如果获得的数据时json格式的,使用json_decode函数解释成数组。

$output_array = json_decode($data,true); //如果第二个参数为true,就转为数组的形式。如果不填就为对象的形式

如果使用json_decode($data)解析的话,将会得到object类型的数据。

封装的一个函数

复制代码
 1 //参数1:访问的URL,参数2:post数据(不填则为GET),参数3:提交的$cookies,参数4:是否返回$cookies
 2  function curl_request($url,$post='',$cookie='', $returnCookie=0){
 3         $curl = curl_init();
 4         curl_setopt($curl, CURLOPT_URL, $url);
 5         curl_setopt($curl, CURLOPT_USERAGENT, 'Mozilla/5.0 (compatible; MSIE 10.0; Windows NT 6.1; Trident/6.0)');
 6         curl_setopt($curl, CURLOPT_FOLLOWLOCATION, 1);
 7         curl_setopt($curl, CURLOPT_AUTOREFERER, 1);
 8         curl_setopt($curl, CURLOPT_REFERER, "http://XXX");
 9         if($post) {
10             curl_setopt($curl, CURLOPT_POST, 1);
11             curl_setopt($curl, CURLOPT_POSTFIELDS, http_build_query($post));
12         }
13         if($cookie) {
14             curl_setopt($curl, CURLOPT_COOKIE, $cookie);
15         }
16         curl_setopt($curl, CURLOPT_HEADER, $returnCookie);
17         curl_setopt($curl, CURLOPT_TIMEOUT, 10);
18         curl_setopt($curl, CURLOPT_RETURNTRANSFER, 1);
19         $data = curl_exec($curl);
20         if (curl_errno($curl)) {
21             return curl_error($curl);
22         }
23         curl_close($curl);
24         if($returnCookie){
25             list($header, $body) = explode("\r\n\r\n", $data, 2);
26             preg_match_all("/Set\-Cookie:([^;]*);/", $header, $matches);
27             $info['cookie']  = substr($matches[1][0], 1);
28             $info['content'] = $body;
29             return $info;
30         }else{
31             return $data;
32         }
33 }
复制代码

这俩个函数虽然不难,但是还是值得学习一下的。因为在做接口或者调用的接口的时候,必定会用到这俩个函数。

这俩个函数虽然不难,但是还是值得学习一下的。因为在做接口或者调用的接口的时候,必定会用到这俩个函数。

微信网页开发,获取access_token并设置定时刷新,PHP

原理:用微信公众号文档的教程获取access_token,编写php脚本,定时刷新,并将值存入数据库,需要用的话就直接从数据库下载,不必再次获取access_token的值。

直接上代码

第一段代码,根据微信公众号提供的教程,获取access_token的值。

<?php
$token_access_url = “https://api.weixin.qq.com/cgi-bin/token?grant_type=client_credential&appid=此处为你的APPID&secret=此处为你的APP密码”;
$res = file_get_contents($token_access_url);
$result = json_decode($res, true); //接受一个 JSON 格式的字符串并且把它转换为 PHP 变量
$access_token = $result[‘access_token’];
// echo $access_token;
?>
第二段代码。将值存入数据库并定时刷新

<?php
header(“Content-type:text/html;charset=utf-8″);
$time=1.8*60*60;//此处设置刷新时间,我设置的是1.8小时,因为设置两小时的话可能会有延迟,导致业务无法进行,尽管微信公众号规定到期后五分钟,新旧access_token都可以使用
$url=”http://”.$_SERVER[‘HTTP_HOST’].$_SERVER[‘REQUEST_URI’];//当前文件的url
include_once ‘access_token_yuanshishuju.php’;//此处插入第一段获取access_token的php文件
include_once ‘coom.php’;//此处插入mysql连接设置文件
mysqli_query($conn , “set names utf8”);
$sql = “UPDATE 表名
SET 字段名= ‘$access_token’
WHERE id=1”;
mysqli_select_db( $conn, ‘数据库名’ );
$retval = mysqli_query( $conn, $sql );
if(! $retval )
{
die(‘无法更新数据: ‘ . mysqli_error($conn));
}
echo “数据更新成功\n”;
mysqli_close($conn);//access_token的值存入数据库
sleep($time);
file_get_contents($url);//此处设置定时刷新,需打开一次该文件,打开后会一直显示刷新状态,然后关闭就行了 ,会一直自己运行,修改本文件后需再一次打开本文件,保证一直刷新
?>
第三段代码,从数据库获取access_token的值

<?php
include_once ‘coom.php’;//数据库连接设置
mysqli_query($conn , “set names utf8”);
$sql = ‘SELECT 字段名
FROM 表名
where id = 1’;
mysqli_select_db( $conn, ‘数据库名’ );
$retval = mysqli_query( $conn, $sql );
if(! $retval )
{
die(‘无法查询数据: ‘ . mysqli_error($conn));
}
$row = mysqli_fetch_array($retval, MYSQL_ASSOC);
$access_token = $row[‘access_token’];//获取该值
mysqli_close($conn);
// echo $access_token;
?>

———————
作者:前端卡卡
来源:CSDN
原文:https://blog.csdn.net/weixin_41797287/article/details/80334195
版权声明:本文为博主原创文章,转载请附上博文链接!