分类:Ubuntu
Ubuntu,应用过程中的知识
Ubuntu 18.04 安装 Apache, MySQL, PHP7, phpMyAdmin
1、准备
更新软件源中的所有软件列表(必须)
sudo apt update
更新软件(建议)
sudo apt upgrade
更新系统版本(非必要时,不建议升级)
sudo apt dist-upgrade
2、安装Apache
sudo apt install apache2
3、安装PHP
sudo apt install php
4、安装MySQL
sudo apt install mysql-server php-mysql
5、配置MySQL
mysql -u root
use mysql;
update mysql.user <span class=”hljs-built_in”>set</span> authentication_string=PASSWORD(<span class=”hljs-string”>’你的密码'</span>), plugin=<span class=”hljs-string”>’mysql_native_password'</span> <span class=”hljs-built_in”>where</span> user=<span class=”hljs-string”>’root'</span>;
flush privileges;
quit;
sudo service mysql stop
sudo service mysql start
6、附加安装
sudo apt install libapache2-mod-php php-mysql php-curl php-gd
7、安装phpMyAdmin
sudo apt install phpmyadmin
8、启用mod_rewrite模块
sudo a2enmod rewrite
sudo service apache2 restart
9、配置
编辑apache2.conf,/var/www/路径可修改(如修改为/data/www/),启用RewriteEngine
<Directory /var/www>
Options Indexes FollowSymLinks
AllowOverride All
Require all granted
RewriteEngine On
</Directory>
编辑 /etc/apache2/sites-available/000-default.conf
<VirtualHost *:80>
ServerName example.com
ServerAlias www.example.com
ServerAdmin service@example.com
DocumentRoot /var/www/example
<Directory />
DirectoryIndex index.html index.php
Options FollowSymLinks
AllowOverride All
RewriteEngine On
</Directory>
ErrorLog /var/log/apache2/example_error.log
CustomLog /var/log/apache2/example_access.log combined
</VirtualHost>
10、权限设置
改变/var/www/目录所有者为ubuntu(腾讯云Ubuntu默认用户)
sudo chown -R ubuntu /var/www/
设置网站权限
chmod 755 /var/www/
chmod 777 /var/www/example/application
chmod 777 /var/www/example/uploads -R
chmod 777 /var/www/example/runtime -R
———————
作者:宝庆陈
来源:CSDN
原文:https://blog.csdn.net/sanve/article/details/80770675
版权声明:本文为博主原创文章,转载请附上博文链接!
Ubuntu18.04下完美切换Python版本
ubuntu18.04版本,python版本python2.7,python3.5,python3.6
因为安装一些库会安装到python3.6上,而默认使用的是python2.7,使用python3,默认会使用python3.5,无法调用安装包。
解决方法:
一,使用python xx.py运行程序时,加上版本号。比如python3.6 xx.py
二,1,要以root身份操作
yz@yz-<span class="hljs-symbol">pc:</span>~$ sudo su
2,确认本机下的python默认版本。调出终端,输入python即可查看默认的版本:
-
root@yz-pc:/home/yz# python
-
Python 3.6.5 (default, Apr 1 2018, 05:46:30)
-
[GCC 7.3.0] on linux
-
Type “help”, “copyright”, “credits” or “license” for more information.
-
> exit()
-
root@yz-pc:/home/yz# python2.7
-
Python 2.7.15rc1 (default, Apr 15 2018, 21:51:34)
-
[GCC 7.3.0] on linux2
-
Type “help”, “copyright”, “credits” or “license” for more information.
-
> exit()
-
root@yz-pc:/home/yz# python3
-
Python 3.6.5 (default, Apr 1 2018, 05:46:30)
-
[GCC 7.3.0] on linux
-
Type “help”, “copyright”, “credits” or “license” for more information.
-
> exit()
-
root@yz-pc:/home/yz# python3.5
3,如何切换这两个版本以及切换默认的python版本:
我们可以使用 update-alternatives 来为整个系统更改Python 版本。以 root 身份登录,首先罗列出所有可用的python 替代版本信息:
-
#update-alternatives –list python
-
update-alternatives: error: no alternatives for python
如果出现以上所示的错误信息,则表示 Python 的替代版本尚未被update-alternatives 命令识别。想解决这个问题,我们需要更新一下替代列表,将python2.7 和 python3.6放入其中。
-
-
-
update-alternatives: using /usr/bin/python2.7 to provide /usr/bin/python (python) in auto mode
-
-
update-alternatives: using /usr/bin/python3.4 to provide /usr/bin/python (python) in auto mode
-
–install 选项使用了多个参数用于创建符号链接。最后一个参数指定了此选项的优先级,如果我们没有手动来设置替代选项,那么具有最高优先 级的选项就会被选中。这个例子中,我们为/usr/bin/python3.4 设置的优先级为2,所以update-alternatives 命 令会自动将它设置为默认 Python 版本。
-
# python –version
-
Python 3.5.2
接下来,我们再次列出可用的 Python 替代版本。
-
# update-alternatives –list python
-
/usr/bin/python2.7
-
/usr/bin/python3.5
现在开始,我们就可以使用下方的命令随时在列出的 Python 替代版本中任意切换了。
(这一步是最关键的)
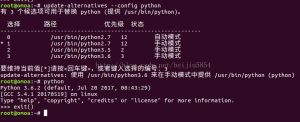
<span class="hljs-comment"># update-alternatives --config python</span>
下面就简单了,会提示你输入序号,你想用哪个版本为默认,就输入序号就可以了!
世界,你好!
欢迎使用WordPress。这是系统自动生成的演示文章。编辑或者删除它,然后开始您的博客!
